matt iulo
SMP Specialist based in NY
Hi gentlemen
I wanted to share with you some photos of a client of mine who has just completed his 2nd session. But instead of sharing the usual final settled transformation, i wanted to show you a couple of detailed photos of what scalp micropigmentation SHOULD look like after 1 session, and what it looks like immediately after the 2nd session.
These photos show the typical redness (which goes away in 2-3 days), but also how a client is able to make changes during his session, and what the process looks like from an SMP provider:
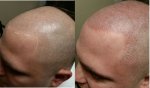
The 1st picture shows my client after 1 completed session & immediately before we got started on the 2nd. You'll see he wished to nudge his hairline down a bit. You'll also notice that before his 2nd session there isnt as much density and the "dots" may appear more distinct. This is on purpose!. You'll see next to it is the after 2nd session photo that the density is closed much more, creating a fuller look. You'll also notice redness and a small bit of inflammation around the follicle deposits. This is also normal and will die down quickly.
The 2nd picture is similar to the first, but shows it from a profile angle. The same is true as youll see he wished to nudge forward the hairline and profile line. You'll see the 2nd session added further density...and youll notice redness well into his own existing hair, which demonstrates the blending which is so important.
The final picture is a typical before and after showing what the treatment looks like immediately after his 2nd session. He chose a natural hairline with a bit of broken and softness.
These pictures im showing arent the prettiest, and thats the point. They show redness, tiny scabbing, and a bit more distinct "dots" then what will heal to the final look 3-5 days post session. Hopefully this helps those considering SMP to understand why it is so important to follow a 2-3 session process. Each sessions adds density, allows for modifications, and keeps you in control!
BestMatt
I wanted to share with you some photos of a client of mine who has just completed his 2nd session. But instead of sharing the usual final settled transformation, i wanted to show you a couple of detailed photos of what scalp micropigmentation SHOULD look like after 1 session, and what it looks like immediately after the 2nd session.
These photos show the typical redness (which goes away in 2-3 days), but also how a client is able to make changes during his session, and what the process looks like from an SMP provider:
The 1st picture shows my client after 1 completed session & immediately before we got started on the 2nd. You'll see he wished to nudge his hairline down a bit. You'll also notice that before his 2nd session there isnt as much density and the "dots" may appear more distinct. This is on purpose!. You'll see next to it is the after 2nd session photo that the density is closed much more, creating a fuller look. You'll also notice redness and a small bit of inflammation around the follicle deposits. This is also normal and will die down quickly.
The 2nd picture is similar to the first, but shows it from a profile angle. The same is true as youll see he wished to nudge forward the hairline and profile line. You'll see the 2nd session added further density...and youll notice redness well into his own existing hair, which demonstrates the blending which is so important.
The final picture is a typical before and after showing what the treatment looks like immediately after his 2nd session. He chose a natural hairline with a bit of broken and softness.
These pictures im showing arent the prettiest, and thats the point. They show redness, tiny scabbing, and a bit more distinct "dots" then what will heal to the final look 3-5 days post session. Hopefully this helps those considering SMP to understand why it is so important to follow a 2-3 session process. Each sessions adds density, allows for modifications, and keeps you in control!
BestMatt
Last edited:


")